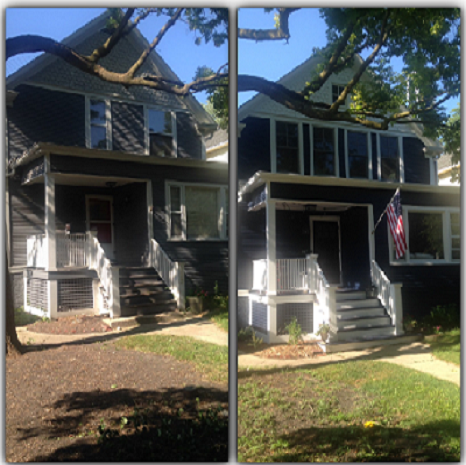
Our House

Our House
Before: House. After: Home!

Sunday, July 26, 2015

Au Revoir Upper Cabinets

This was an easy one! 

Not that difficult!
Chris working on the 2nd cabinet


Screwdrivers were really the only tools we needed to get these upper cabinets off the second floor kitchen walls.

I love when things go smoothly!

After - no more cabinet!
We also had our first fail....a stripped screw in just the wrong place made this greasy shelf impossible to take down on the first try.
1st DIY fail - the stripped screw really screwed us

Good thing I have some of the world's greatest friends who are willing to help me with my crazy DIY renovation projects! Thanks to Laura we got that nasty shelf off the wall & into the garbage (where it belonged!). It involved a hacksaw blade & some brute force....I wouldn't recommend our method!
After- no more cabinet & no more greasy shelf! Thanks Laura!
Also, thanks to our friend Mark, we now know our sweet exhaust fan in the 2nd floor kitchen is fully functional! All it took was pulling the chain (which we hadn't done :) Nice to know it works, particularly given the stubborn smell of natural gas in the 2nd floor kitchen. Airflow is good if there might be a gas leak. Next on the list, call the gas company........

Monday, July 20, 2015

Goodbye Carpet on the Stairs

I don't have anything against carpet, per se. I do have a big problem with stained, old, worn out beige berber carpet covering the front stairs & foyer.Chris & I were really hoping to find hardwood under said nasty carpet & we did! 

Before- gross carpet on the front steps

This was our first experience ripping out carpet and it was satisfying to be sure. Taking the carpet off is relatively easy once you get a corner of it up. The pad comes off just as easily. 


First stairs showing
Hooray! Hardwood!
Next up are the staples, which came out pretty easily, we used pliers to grab them straight out. The stubborn/flattened staples were forced out using a flat head screwdriver. We were trying to be mindful not to gouge the wood because we are keeping it. We are excited at the prospect of keeping as much of the old house that we can - including things like hardwood. The contractor will refinish the stairs once the "real" work begins - but our efforts have paid off already.


The trouble is these beastly things.
After - in the garbage!
Before- evil plywood on steps
I don't even know what they are called, but they are strips of plywood that are nailed into the stairs and have nails pointing up into the world. Horrible to remove. The plywood splits & splinters & shreds out in a very unsatisfying way. 

Good thing I have my Dad to give me advice; I had no idea how to get this pesky pieces of nail filled plywood off of the stairs. Dad did (which is a shock to approximately no one). Again, I don't know the name of this wonderful tool - but it worked wonders. If you are removing carpet - do not begin without spending $14.99 on this tool at your local hardware store!
The wonderful tool! Plus a close up of the evil plywood.
Another huge help for this project were the 2 pairs of knee pads our (lovely) tenant found while she cleaned out the basement before she moved. We could not have done this project without them, as we spent a couple of hours hunched over on our knees pulling out the staples & strips of awful plywood. 

It was dusty work and there were shards of plywood & sometimes nails flying around (I had to use a lot of force with the fulcrum tool to remove some of the plywood strips) so I took the appropriate precautions. Though I'm not big into selfies...this was too funny not to photograph!
Looking good - safety first!
We were so very excited to finish the stairs - they look SO much better already! I'd love to hear about your experiences taking out carpet - if you've ever tried. We've been encouraged so much by this DIY effort, we're going to keep on trucking to see what other treasures we find! 
After - voila! Hardwood!


Thursday, July 16, 2015

It is officially official; we bought it!

We are happy homeowners! It is official!
I'm starting a little late in the game on this blog, but I wanted a place to track the progression of our house to a home!

We bought the 2 flat in February, 2015 with plans to convert it to a single family home. A single family home that will be our forever home! We fell in love with the location of the home before we knew the home was an option for us. We live closer to the El at this home than we did in our city house, closer to the Metra too! There are lots of parks, some tennis courts & a golf course within a block or two. We can easily walk to a few different neighborhoods for bars, restaurants & shopping. Once we were able to see the inside of the building, we saw past the mold & mildew (see photo below), past the beer signs & bed sheets cum curtains, saw past the messes and saw lots of potential. One of our tenants even allowed us to see how nice the home could be despite its less than up to date state. I should have mentioned that the house was built in the 80s. The 1880s! Depending what record you believe; it was built in 1883, 1885 or 1888. Regardless of its true age, I know 1 thing....it is very old. The other thing I know; Chris & I like old houses! Fun fact; we are nerds & watch a whole lot of the PBS show This Old House. Check it out - it is amazing.
Sweet blue tub with LOTS of mildew
One thing we both knew was that we could envision having coffee and/or happy hour on the home's sweet little front porch:
Honestly, I can't wait for coffee out here!
Also, there is a little porch off the back of the house on the 2nd floor....there will be many mornings spent reading the newspaper and drinking coffee up there. There is a lot to love about this building and lots to be improved upon (mainly the electrical system & plumbing system!). Our plan is to do some of the demolition ourselves and hire a general contractor to complete the bulk of the renovation.

Things started off slowly, as they tend to do, mostly because we had tenants living in the building until the end of June, 2015.

So, here we are, July 14, 2015 - almost exactly 5 months after we closed on the building, really getting going on transforming this house into our home!

Stay tuned, I'll be sharing lots of renovation photos in the coming weeks & months!

Thanks for visiting,
Liz (& Chris too)

Tree Trimming

 It might be the understatement of the century to say the trees around our house really needed to be trimmed. It could've been 25 years since they'd been done!
My 80 year old Dad; a total rockstar


My Dad helped me trim some of the most offensive branches from the front of the house (they were resting on the porch roof....yikes). While we were on the flat roof, we cleaned all of the small plants out of the gutters along with the typical gutter gunk. Did I mention yet that my Dad is the best? Because he is (see above re: gutter gunk).


Why wouldn't they??


Chris had committed to a charity golf outing on the day I figured I could work on the exterior of the house; but he made sure to swing by with a friend or two to show them the house. Note their mode of transport :)


After- view from 2nd floor


After - Front view


Once our tenants moved out, we hired a professional to remove the dead/diseased trees in the back & heavily trim/prune everything else. We love how big the sky in our yard seems now!


Thankfully though, little Lizzie got a chance to swing in the hammock before we had to remove those trees!
Before- Little Lizzie Lounging

Before- where is the house?!? How 'bout the touchdown tree?


The backyard feels so much bigger now that the dead trees & overhanging branches have been removed. We had to get rid of the funniest looking tree we'd ever seen, pet named (by us) the "touchdown tree", which wasn't ideal- but it was dead as a door nail - so out it went!. The only bummer? Where will we hang the hammock now?!?  Thoughts are welcome!
After - backyard