Our House

Our House
Before: House. After: Home!

Friday, July 22, 2016

Neighbors generosity prompts major yardwork

Honestly - how did we get so lucky? We might have the world's best neighbors. This is only 1 of many reasons they are the best:

Wagon chock full of 60ish hostas!

After a casual, "I'm going to be working in the garden this weekend now that school is out. Do you guys want some plants?" we received this wagon FULL of hosta from our next door neighbors. There was also sedum, black eyed susan, and some other plant that has really really really soft light green leaves. Like almost furry soft. Anyone know what those are called? Despite my efforts to turn my brown thumb green, I still have no clue what they are called!

The yard is a mess all around the house. Weeds, construction debris, gravel, broken bricks, full bricks, and the occasional patch of actual grass all peacefully coexist. Until the windfall of beautiful, free plants! I decided to line the east side of the house with the hosta and pot the rest to use once the professional landscaper has performed his magic on the backyard.

Here are the progress photos:
Before: dirt, weeds, nothing pretty

During: I dug a trench....because I thought
spacing the plants would be easier this way.

After: The hosta are in! Hooray!
After: different view
I am sad to report that 3-4 of the hosta are NOT happy. They are wilted and flat to the ground and in no way thriving. I fear they may be getting too much sun. I'm not sure though. Does anyone have any expertise on hosta? Particularly after they've been transplanted? I could have overwatered them initially; a friend told me that more plants die from over watering than under watering. I might have helicopter parented these poor plants to death. Darn it. I suppose there is a chance they could come back next year?? Tell me there's a chance!

Here's a shot of the front garden bed:

The bushy plant on the far right is the only thing in this bed that survives from our home's previous owner (or probably more likely renter). It is almost done flowering - it has white blooms that look quite like a hydrangea; but it isn't a hydrangea! Again, not sure what it is. Someday I might learn!
As I look at this photo I am realizing I should take an updated one. I've planted more in this bed since the photo was taken! 

What do you have growing in your garden/yard/community plot/pots/etc? I'm trying to glean as much from others about what they do to learn how to be better at this whole gardening thing!

Sunday, July 17, 2016

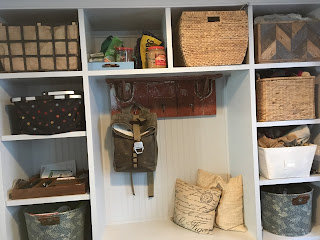
Mudroom built in......before & after over many months


We were so excited to have our mudroom finished off with some built in storage! It was a project that could wait until after we moved in, so it did :)

Our carpenters built the built in on site in early June, 2016. The painters came back to paint it in July!
Mudroom built in's future location....doesn't look like much now!

The bench/first set of cubbies are in!
The top row of cubbies are assembled in the kitchen!
Side sets of cubbies have adjustable shelves, so cubby size can change
Ta da! All done! Even have our barn wood hooks installed in the center, so we can hang coats/bags.
Just waiting on paint and our permanent side door........I'm tired of the temporary door!!


January, 2017 - full of all of our stuff! Verrrrry full!

All stocked up & done with the built in.
Plus- the new side door is finally installed!

Looking down the basement stairs, we installed more hooks everywhere;
winter in this part of the world requires so many coats! At the landing of the stairs is a set of
hooks on barn wood (wonderful housewarming gift from GR & Tara) where we stash
our most used gardening gear. Don't have much need for it these frigid days....currently the
wind chill is -6 degrees. Home sweet home!!

Thursday, July 14, 2016

Extra door turns into a headboard

We have some doors lying around in our basement. They live in what I call the 
"treasure pile". 
Treasure pile with 3 doors and 1 door frame

Treasure pile #2
3 more doors :)

Half of Treasure pile #3....couldn't fit the rest into the photo!
Not pictured -
one more door in its own Treasure pile #4
Most folks would call it a garbage pile. If they were being generous they might call it a scrap pile. To me- TREASURE! There are all sorts of projects just waiting to be done with our old doors, windows & pieces of wood. They all hold bits of our home's history - which is probably why I want to hold on to them. Or maybe because I am my father's daughter & I hate to throw anything away......could be a combination of the two!

This post (which I found on Pinterest; no one is shocked by that) sparked my interest since we have a glut of cool old doors. I love when I find tutorials for DIY projects that seem do-able. Projects that don't require a shit ton of tools or equipment that I don't have, or have a bazillion steps so I know I'll never motivate to complete them. This project seemed like a pretty good fit for my low level skills! Having my Dad participate was incredibly helpful too - working on projects with my Dad is like sleeping with my baby blanket & teddy bear (who is named Teddy): I don't NEED to do have those things to sleep, but having them makes sleep SO much easier. Same goes for any DIY project I've tackled thus far. I don't bite off too terribly much - so I am fairly confident I could do them on my own; but having Dad come to help makes the entire process not just more enjoyable but quicker & easier too.

I started by washing the door with what I imagine to be a horribly toxic substance called TSP (Tri Sodium Phosphate). 
See the difference the TSP made on the sunporch walls?
Happily scrubbing away.....
It was recommended to me by a woman who does a lot of home painting projects for her interior decorating clients; so I knew I could trust that it would work. If you caught me washing our sunporch walls you would've noticed I was using the same product for that job. It cuts through grease/grim/dirt/smoke with ease. Between the door & the sunporch walls I had all 4 of those nasty substances!
I forgot to take a "before" washing photo - hence showing the
power of TSP above!
Next I had a pretty good time making a "custom" paint color. By custom I mean I dumped a whole bunch of leftover samples of blue paint into my tray & mixed well. We spent a stupid amount of money on paint samples for the house; so I figured I may as well get some mileage out of them!!
Mix mix mix!

I like how the colors swirled together
I taped the plate on the door so I wouldn't paint over it. I think it is pretty & reinforces the fact that we recycled a door into a headboard in our 2nd guest bedroom!

Then I painted the door; two coats to make sure the color was as rich as possible - but I didn't bother to paint or wash (as I sadly discovered when we put the headboard on the frame) the back of the door. I figured no one would see it which is true- though I could've washed it for God's sake. Its pretty gnarly back there.

Dad & I had some purchasing issues for the bolts that would connect the door to the 2x6s that hold the door up (they also connect the metal bed frame to the 2x6s). Dad went to the hardware store once & I went no less than 3 times before we finally had the right bolts. Oops. What a giant waste of time!!

Once we had the materials we finished the project really quickly- probably only an hour or so to get everything measured (to be sure we had the door centered) and connected!
Using our TV box to protect the mattress,
Dad is lining up the 2nd 2x6 support. We
bolted both supports to the metal frame
near the floor before moving up and bolting
the headboard to the 2x6s

No yet secured - notice the scrap wood between the door
and the TV box? We're making progress though!
We love the new bed! I still need to touch up the paint near the plate & also paint the
 2x6 where it is visible; but that will happen another day :)
Hope you enjoyed this project as much as I did! We are really quite pleased with the final product! We have also had our first overnight guests (my sister & niece) so the bed was tested & worked! Special shout out to my Mom who gave us the pretty coral pillows and my sister who gave us the Euro sham cases!  It takes a village to decorate a guest room!

Update February, 2017:
Dad helped put the finishing touches on this project this week! I am so thankful that Dad has a bazillion tools & knows how to use them & is willing to teach me!

I have wanted to add lights mounted on the door headboard since we started the project.....but the lights, cords, switches, etc sat in boxes under my desk (which lives in this guest bedroom) for 7 months before I admitted defeat and finally asked Dad if he could spearhead this part of the project. I bought wall mounted fixtures that are intended to be hardwired into building power; but I wanted to add switches & cords so the lights can function like a reading light/bedside lamp.

I didn't take any photos during the project, but here is the final result:

Yipee! Lights are on the headboard!

I am THRILLED! Finished just in time to have friends visit for President's Day Weekend!!

Sunday, July 3, 2016

May 20- Thank you treats & 1st night in our new old home!

Happy Friday May 20, 2016!

This was our first night sleeping in our new old home!! 

Hip hip hooooooray!

The day dawned with a "thank you so
much for your help" surprise party for family & friends

I went to 2 of my favorite bakeries to pick up
treats for everyone. Yum.

The lovely Kearney, Platt & Kramer ladies posing in front of
our freshly installed fireplace mantle.

Tara brought the Kearney kiddos for a Friday morning visit-
made the morning feel very festive!

Literally a perfect night for a fire in our new fireplace! 
Cheers to burning the extra wood leftover
from the renovation


Wednesday, June 29, 2016

Moving day is finally here!

Wednesday May 18, 2016

Hip hip hooray! It is MOVING DAY!! At least for our belongings :)

The movers came to my parents' house for 2 pieces of furniture, then onto our storage unit and then to our forever home.

Thank goodness for the help of my sister, parents and Chris - I threw my back out on Tuesday, so was totally and completely useless Wednesday. My Dad continually reminded me to "just point" or "the only thing you should be working is your finger" to point where boxes should go :) 

Double thankful that my Mom has had issues with her back in the past and had prescription muscle relaxers I could use before bed for a few nights. Not that I'm advocating using someone else's prescription meds, but if it is your moving week & you throw out your back for the first time ever; you may want to consider it.

Here are some of the highlights (and comical low lights) of the day:
There is only 1 mug appropriate for moving day while you
are in quite a bit of physical pain. This is the one.


Just another day at storage.....caution tape & safety cones
are not typically signs that your move is going smoothly.....
Moving is stressful, right? At least it is for me. Things like
this......the driveway just adjacent to our unit being torn up for
new electrical service......do not help my stress levels.

Despite the chaos at storage, the movers (with help from Dad, Marg & a tiny bit from me)
emptied our storage unit in a hurry!


Fast forward - this is  the last layer of boxes
and furniture in our moving truck! Busy busy busy!
Yes, my superhero sister wore my niece on her back while
moving boxes out of the truck. Unreal. 


Now to the mass chaos inside the house!
At least we had Hennie to keep us smiling :)

Lunch break! Note the boxes in the background :/

Hennie had been working hard - she was hungry!

  
Technically the day after moving - but H was very
helpful as we unpacked!! 

Well, we did it. With epic amounts of help from our family and friends! Our stuff made it in!

Sunday, June 26, 2016

Breathing new life into an old dresser

If you have never tried chalk or chalked paint, I highly encourage it! It is NOT chalkboard paint; it is regular paint that can be slathered onto any surface with little or no preparation! This dresser is destined for use in our bedroom closet (it came out of my parents' old basement; but by the time Chris & I snagged it, it was my brother & sister in law's basement!) so the chalk paint look was perfect.
It is matte finish, it is NOT perfect - I didn't feel like doing a 2nd coat!
It is quite forgiving and can mask blemishes on the surface you plan to paint.
Give it a whirl - you won't regret it! I bought this can at Home Depot.
Before Paint (but after power sanding)
Before paint

After paint


Drawers before paint
Drawers after paint
Old drawer pulls

New drawer pulls - basket weave design

Final product! We use it inside our closet under our short hanging clothes.

I would love to hear about any painting projects you are tackling! Tell me about them in the comments!